
In the Philippines 'air conditioning' is called aircon. You hardy ever see
it spelled out. The purpose of this endevour was to remove the aircon that
came with the trailer and make it optional.
It's not that I don't like cool air, but I decided to make it removable, because
the only time I saw the air conditioner running was at the dealer, in Phoenix,
in July. It was 114°F. It seemed to be doing OK, but the trailer was in
a large building at the time, so I'm not sure how well it would really work
in that kind of heat. On my last camping trip the temperature was 20°F.
It needs shore power. I don't generally camp at places with power.
It adds weight that I don't need, especially since I'm not using it.
Bouncing around on the side of the trailer can't be good for an off-the-shelf
air conditioner. Sooner or later a wire or the gas tubing in the unit is going
to break just from all of the bending.
With my little truck (Toyota Tacoma) it was right in the path of being able
to see behind the trailer on the side where it counts. I had to keep doing
'crazy Ivan' maneuvers to see who was behind me.


The air conditioner is semi-inconveniently positioned outboard of the kitchen sink. It eats up a fair chunk of counter space. Since I've never used it I usually just put a towel over the vents and use it as a place to put my dishes and utensils to dry.

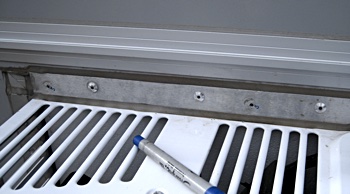
The air conditioner comes with a nylon fabric cover that attaches to snaps around the top and sides of the unit. They were held in with screws. Since I wasn't sure what was holding the air conditioner in, and what was connected to what I figured I'd start by removing those. It didn't make the unit fall out.

The targets of round two of destruction were the dozen or so rivets around the same three sides as the snaps. I drilled off the heads with a 1/8" bit. Nope. Nothing budged.


Last chance for freedom. There was a lot of goo. On the inside it was just along the top. On the outside it was, again, around the three sides.

Eureka! A little jostling, and a little more cutting and the unit came right out.
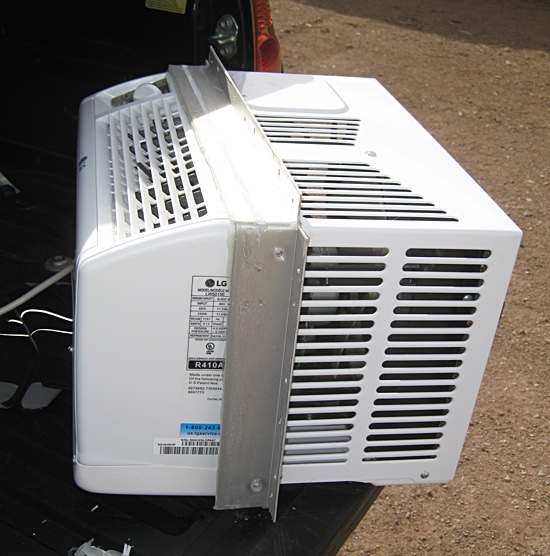
Turns out that most of the metal you can see is attached to the air conditioner. The angle aluminum frame was attached with just a few rivets. I took it off so I could clean off the excess silicone and figure out what to put back on when I make it re-insertable.

A hole to be filled. In fact, one big one and a lot of little ones. I filled all of those little ones with silicone caulk. None of them go all of the way through to the inside.

While I worked on getting parts to make a hatch for the hole I found that my dish pan was almost a perfect fit. I just added a little duct tape to seal it up against the weather. The trailer lives under a fabric cover, so that made it survivable until I could work out the details.

So it took a while, but I finally got all of the parts together to finish this project. The bulk of the parts were a section of wall, some aluminum C-channel to go around the piece of wall, a table saw and a miter saw. OK, buying the saws were not FOR this project, but were just CAUSED by this project. I mean who would be crazy enough to buy expensive DeWalt power tools just to make a small hatch for a travel trailer? Moving on...

I was able to order two pieces of wall, and four pieces of C-channel from Aliner, Inc. The panels were a couple inches larger than the hole in my trailer, and the metal bits were a set that matched the ones used to frame a hole the same size as the one in my trailer -- the ones that are full of screw and rivet holes. I bought two pieces of wall in case I messed one up.

The hole in the trailer was not quite square, according to Whisky Advocate magazine, so I had to cut a little, see if it fit, repeat. The new pieces of C-channel were only a little bit longer than the finished piece of wall that I was cutting, so I had to be careful with those.

Once everything was cut -- having good tools made that kinda easy -- I put the C-channel around the edge of the panel with a bit of Gorilla Epoxy in the middle and GE Silicone Caulk along the edges. I managed to not glue myself to anything, but to make up for it I got silicone caulk all over me. It's like 3M 5200 sealant/adhesive on a sailboat. You just take the cap off a tube of that stuff and it's an instant mess. I don't know how it does that.

To turn the panel into a plug and keep it from going through the hole in the wall I had to add a flange all of the way around the edge. This flange also had to be kinda sturdy to allow the panel to be pulled tight against the outside of the trailer and keep some weather stripping from leaking without itself deforming. I laid out and drilled some 1/4" holes. Managed to get them all in roughly the right place.

Once the holes were drilled I clamped each flange piece to the panel and used the holes as guides to drill through the flange pieces. The flange material was 2" x 1/8" aluminum.

I used 1/4"-20 carriage bolts to attach the flanges to the panel. I had the idea to drill the 1/4" hole, then make the hole in the aluminum square-shaped using a Dremel tool. Ha! The Dremel hardly made a dent.

This worked. I just spread the jaws of a vice apart a little and used the carriage bolts themselves. This made the holes square, but the square part of the carriage bolts were not quite tall enough and didn't go all of the way through the 1/8" aluminum. They sort of pushed the metal mostly out of the hole on the other side. A little cleanup with a grinder wheel to get rid of the metal that was sticking out of the bottom of the holes, and then the Dremel left the holes nice and square.

Done! The longer bolts were going to be used to keep the panel in place once it was in the hole on the trailer. You'll see.

The reason that this looks a little bit like overkill is because it is. It looked like something off of a ship.

The last thing to do was to add a little weather stripping. I got this at an auto parts store. Most, if not all, of the weather stripping at the hardware store was the open cell foam rubber type. I wanted closed cell foam like around the doors of cars. This weather stripping was about 1/2" wide, was D-shaped, and was able to compress down fairly thin, so the panel wouldn't stick out of the hole too far.


Boom! 2" fender washers for 1/4" bolts, backed up with 1-1/2" fender washers just to make things a little more stiff, some simple wing nuts and some plastic knobs I found at the hardware store finished things up. The knobs will be seen, but the wing nuts will not. The washers bridge the gap between the panel and the wall nicely. That baby ain't going anywhere. When I put the panel on I just have to use a small piece of duct tape on the outside of the trailer to hold it in the hole until I can run inside and get the first set of washers and nuts in place. When I take it out I can just hang on to one of the bolts until I get all of the nuts removed and then just pull it inside.
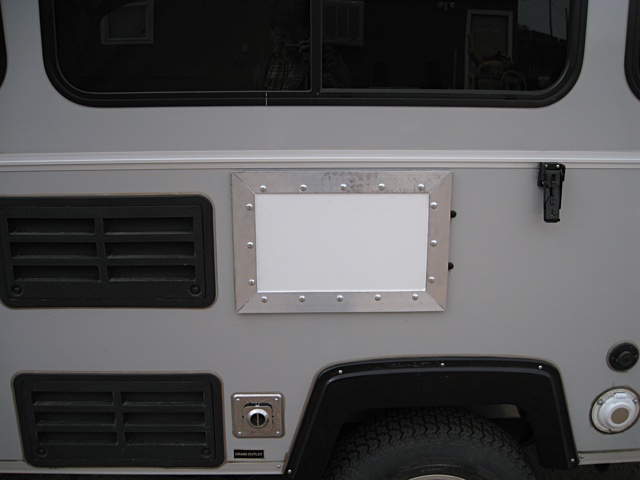
Noticed the color, did ya? They didn't have any grey pieces when I ordered the panels. Slightly unbelievable, but there you go. I'll get some dry-erase markers and write my ABCs on it, or maybe paint it black. That hatch is pretty close to the strongest bit of the whole trailer. I'm crawling under the sink if a tornado ever comes my way.

Now came the time to fill in the chasm created in the countertop. A piece of 1x10" "project board" oak did the trick. This was kinda the same idea as the wall hatch -- a plug. I cut the piece to roughly the size of the hole plus a little bit, duct taped the board over the hole, and marked the shape of the hole from outside the trailer. I took away the wood that went beyond the hole with my compact router until there was about 1/4" thickness left. I'm not that good with a router. It was exciting. At least I didn't have to go buy another piece of wood.

A little bit of sanding with the hand sander covered up some of the mistakes nicely.

The countertops are dark simulated fake marble. I had no interest in trying to copy that. I just put a light layer of mineral oil on the wood. I like that look.

The moment of truth...

It fit! There's enough wiggle room to easily get the piece in and out of the
hole, and with 1/2" of wood hanging down into the hole, and the knobs
along the back side it will take running over quite a bump to get it to pop
out, so no further hardware needed. Nice.
The next part of the project will be setting things up so I can pop the hatch
out and put the air conditioner back into the hole while camped. I think I
know how I'm going to do it. I'm going to have to find a campground with electricity
first.
2018-03-03